OCI IAM Social Sign-In for APEX: A Step-by-Step Implementation Guide
Why Bother With Social Sign-In?
Most APEX apps start life with the built-in Application Express Accounts authentication scheme, and that's fine for a lot of internal tools. But the moment an app has to sit in front of real users — partners, customers, or a broader internal audience — password fatigue and account sprawl become real problems. Every extra password is another support ticket waiting to happen.
OCI Identity and Access Management (IAM) gives you a cleaner alternative: let users sign in with an identity they already trust — their Google or Microsoft account — and let OCI IAM broker the exchange. You get Single Sign-On across every app registered in the same Identity Domain, Multi-Factor Authentication enforced centrally, and a sign-on audit trail you don't have to build yourself. None of that logic lives in your APEX app; it all lives in the Identity Domain.
How the Pieces Fit Together
Before touching any screens, it's worth seeing what's actually being exchanged, because most configuration mistakes come from mixing up which URL belongs where. This is a standard OAuth2 Authorization Code flow with OpenID Connect layered on top, with the OCI IAM Identity Domain sitting in the middle as the broker between the APEX app and the social identity provider.
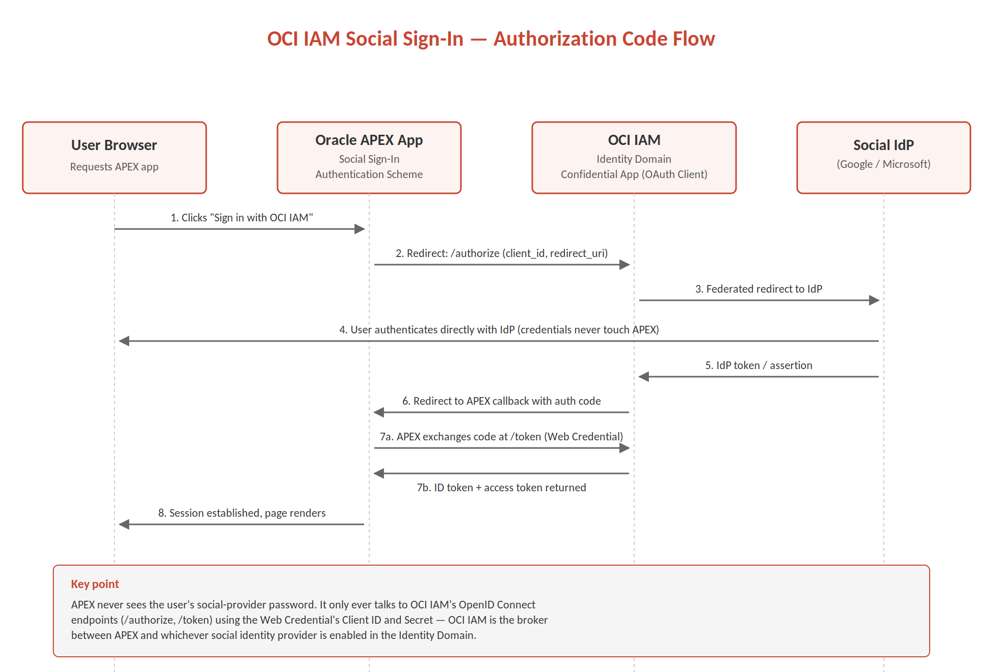
The detail worth internalizing: APEX never receives or handles the user's Google or Microsoft password. It only ever talks to OCI IAM's OpenID Connect endpoints, using the Client ID and Secret stored in a Web Credential. That's the whole reason this is more secure than rolling your own social login integration by hand.
Prerequisites
• Access to an OCI tenancy with permissions to manage Identity Domains and Integrated Applications
• An OCI IAM Identity Domain (the current-generation domain type, not a legacy IDCS stripe)
• An APEX workspace on an Autonomous Database instance, with App Builder access
• A social identity provider enabled in the Identity Domain (this walkthrough uses Google, but the steps are the same for Microsoft or any other configured provider)
Step 1: Build the APEX Application and Grab Its Callback URL
Start with a plain APEX application — the authentication scheme can be swapped in after the fact, so there's no need to build anything special upfront. Create the app through App Builder, run it once, and note the application URL. You'll need it twice: once as the Application URL when registering with OCI IAM, and once (in a different form) as the Post-Logout URL.
Example: https://apexworkspace-apexapp.adb.us-phoenix-1.oraclecloudapps.com/ords/f?p=901
The more important URL is the APEX callback URL, which is what OCI IAM will redirect back to once a user has authenticated. you can derive this URL by adding /apex_authentication.callback suffix to application workspace URL . Copy the URL somewhere safe — you'll paste it into the Redirect URL field on the OCI IAM side in the next step.
Example: https://apexworkspace-apexapp.adb.us-phoenix-1.oraclecloudapps.com/ords/apex_authentication.callback
Step 2: Register a Confidential Application in the OCI IAM Identity Domain
Switch over to the OCI Console. From the navigation menu, go to Identity & Security → Domains, and open the Identity Domain you want to use (the default domain works fine for a first pass, though production setups often warrant a dedicated domain). In the available options, click Integrated Applications, then Add Application, and choose Confidential Application.
A confidential application is one that can safely hold a client secret — it runs on a server (in this case, ORDS) rather than in a browser or mobile app, so OCI IAM trusts it with more than it would a public client.
1. Give the application a name, e.g. APEX Social Sign-In Demo, and optionally a description and icon.
2. Paste the APEX application URL (from Step 1) into the Application URL field and click submit
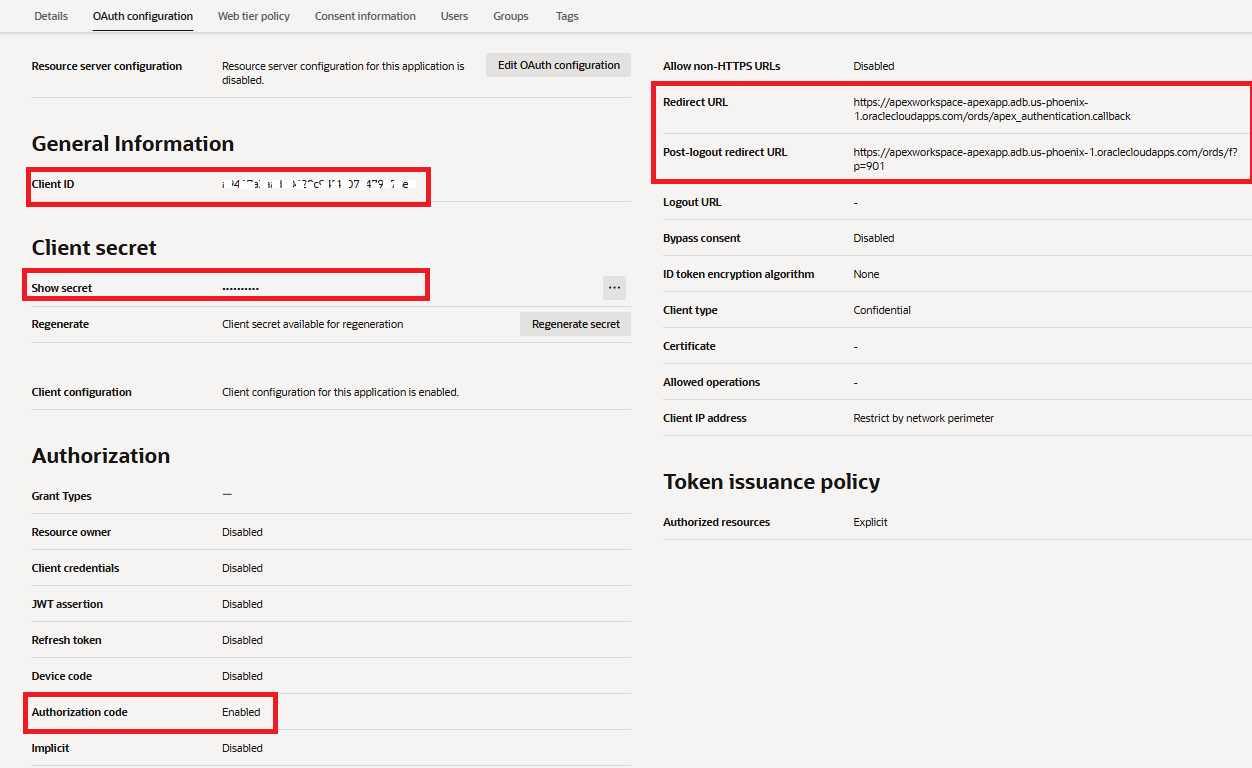
3. Edit OAuth configuration and on Client Configuration section, select “Configure this application as a client now.”
4. Under Allowed Grant Types, check Authorization Code.
5. Paste the callback URL you captured earlier into the Redirect URL field.
6. Set the Post-Logout URL to the APEX application URL.
7. Skip the Web Tier Policy step, then click Finish, and Activate the application.
Once activated, open the application again and note the Client ID and Client Secret — these go into APEX in Step 4. Also grab the Identity Domain URL from the domain's main page; you'll turn that into a Discovery URL shortly.
Identity Domain URL Example: https://idcs-abcd12345efghijk.identity.oraclecloud.com:443
|
Field Note If the Identity Domain doesn't
already have Google (or your chosen provider) enabled as an identity
provider, the authentication scheme will build fine in APEX but the sign-in
button will fail at OCI IAM's side with a vague provider-not-found error.
Enable and test the social identity provider directly in the Identity Domain
first, before wiring APEX to it — it isolates which half of the chain is
broken if something doesn't work. |
Step 3: Build the Discovery URL
OCI IAM's OpenID Connect metadata endpoint follows a predictable pattern: take the Identity Domain URL and append the well-known discovery path.
<Identity Domain URL>/.well-known/openid-configuration
For example, if the domain URL is https://idcs-xxxxxxxxxxxx.identity.oraclecloud.com, the Discovery URL becomes https://idcs-xxxxxxxxxxxx.identity.oraclecloud.com/.well-known/openid-configuration. Keep this handy — it's what tells APEX where to find the authorize, token, and userinfo endpoints automatically, so you don't have to enter each one by hand.
Step 4: Create a Web Credential in APEX
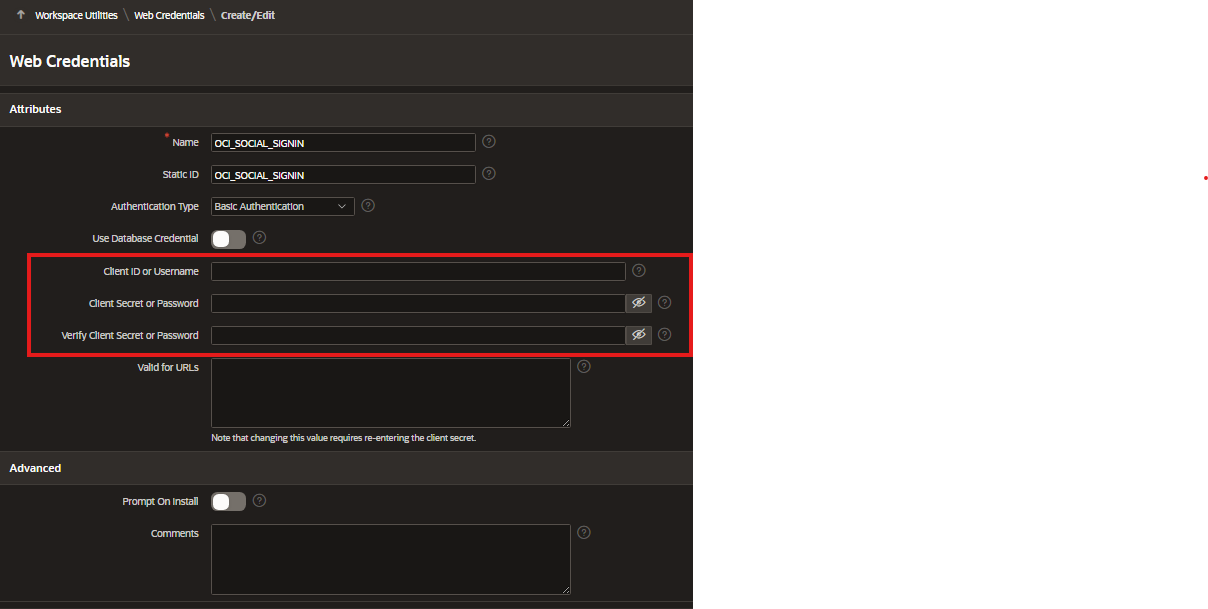
Back in App Builder, open Workspace Utilities → Web Credentials, and click Create. Web Credentials store the Client ID and Client Secret in encrypted form at the workspace level, so they're reusable across every app in that workspace rather than being duplicated per app.
1. Give it a name and a Static ID (e.g. OCI_SOCIAL_SIGNIN).
2. Leave the Authentication Type as Basic Authentication.
3. Paste in the Client ID and Client Secret captured in Step 2.
Step 5: Configure the Authentication Scheme
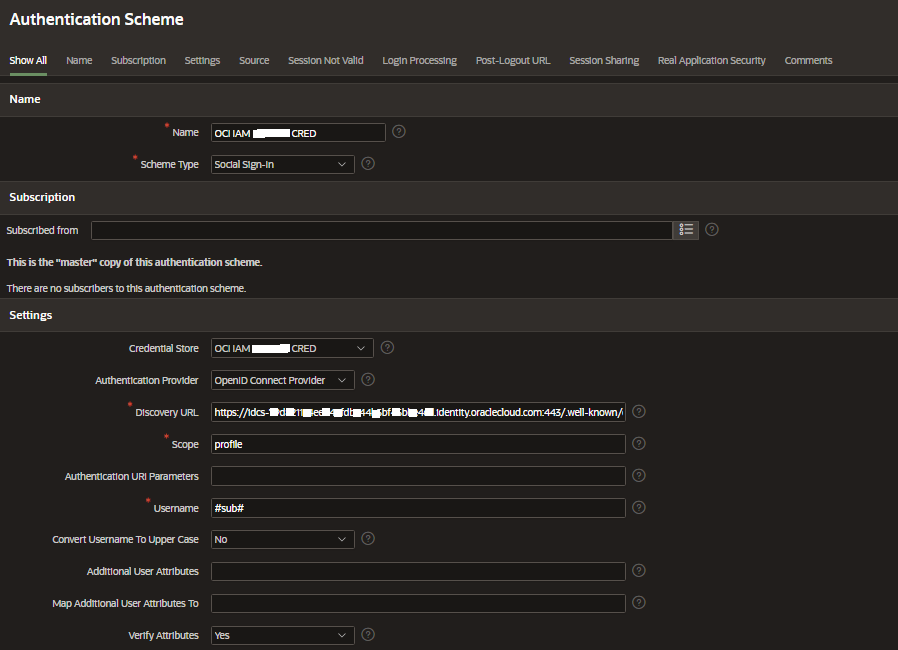
This is where APEX is told to hand off login entirely to OCI IAM. In the App Builder, go to Shared Components → Security → Authentication Schemes, click Create, and choose “Based on a preconfigured scheme from the gallery.”
• Scheme Type: Social Sign-In
• Web Credential: the one created in Step 4
• Authentication Provider: OpenID Connect Provider
• Discovery URL: the URL built in Step 3
• Post-Logout URL: Go To = URL, set to the APEX application URL
The table below summarizes exactly what goes where, since it's easy to mix these fields up on a first pass:
|
Field |
Value |
|
Scheme Type |
Social Sign-In |
|
Web Credential |
Static ID created in Step 4 (e.g. OCI_SOCIAL_SIGNIN) |
|
Authentication Provider |
OpenID Connect Provider |
|
Discovery URL |
Identity Domain URL +
/.well-known/openid-configuration |
|
Post-Logout URL – Go To |
URL |
|
Post-Logout URL – URL |
APEX application URL |
Save the scheme, then make it the app's current authentication scheme from the Edit Application Definition page (or apply it directly if the wizard offers to).
Step 6: Test the Flow
Run the application. If everything above is wired correctly, the standard APEX login page never appears — the browser redirects straight to the OCI IAM sign-in screen, then on to the social provider's consent screen, and back into the app with a session already established.
First-time sign-in will typically prompt the user to consent to the application accessing their basic profile information — that's expected and only appears once per user per application.
Field Notes: What Actually Goes Wrong
The reference documentation makes this look linear, but in practice a few things trip people up. None of these are APEX or OCI IAM being unreliable — they're just easy to get out of sync between the two consoles.
|
Watch out — Redirect URL mismatch OCI IAM matches the Redirect
URL exactly, including trailing slashes and http vs. https. If you rebuild or
clone the APEX app, the callback URL can change subtly (a different app
alias, for instance). Re-run the GET_CALLBACK_URL query after any clone or export/import
and update the confidential application's Redirect URL to match — otherwise
you'll get an OAuth error at the OCI IAM step with no obvious clue as to why. |
|
Watch out — Discovery URL typos It's easy to paste the
Identity Domain URL without the well-known suffix, or to add it twice. APEX
will usually let the scheme save either way, but sign-in will fail at runtime
rather than at configuration time, which makes it a frustrating one to trace back. |
|
Tip — Testing across environments If you're testing this in a
lower environment and then promoting to production, remember the Web
Credential and the confidential application's Redirect URL are both
environment-specific. Treat them the same way you'd treat any other
environment-bound configuration — they don't travel with an app export. |
|
Tip — Multiple apps, one Identity Domain A single confidential
application in OCI IAM can only have one set of redirect URLs configured for
it, but you're not limited to one app per domain — register a separate
confidential application per APEX app that needs social sign-in, even if they
share the same Identity Domain and the same enabled social identity
providers. |
Wrapping Up
Once this is set up, the APEX app is no longer in the business of storing or validating passwords at all — that responsibility sits entirely with OCI IAM and whichever social provider the user picked. Beyond removing password-related support tickets, this also opens the door to centrally enforced MFA and Single Sign-On across every app registered in the same Identity Domain, without touching APEX's authentication logic again.
The setup involves more moving pieces than a database authentication scheme, but each piece maps to a single, well-defined responsibility — OCI IAM owns identity, the Web Credential owns the secret, and APEX owns the session once it's established.