Selective Code Merges: Cherry-Picking Commits in Oracle Visual Builder Studio
A practical, step-by-step guide for VB Studio developers who need to move a single commit between branches — without dragging the rest of the branch history along with it.
Why Cherry-Picking Matters
If you've spent any time working across feature branches in Visual Builder Studio (VB Studio), you've probably run into a moment like this: a fix landed on the wrong branch, or a single change from a long-running feature branch needs to reach production right now, without bringing the other half-finished work with it. Merging the whole branch is overkill. Manually re-typing the change is risky and slow. This is exactly the gap that cherry-picking closes.
A cherry-pick takes the changes introduced by one specific commit and replays them as a brand-new commit on a different branch. Nothing else about the source branch — its other commits, its history, its in-progress work — comes along for the ride. VB Studio bakes this workflow directly into its Git tooling, so you don't need to drop out to a local Git client to do it.
|
Where this fits in your workflow Cherry-picking is most useful for three scenarios:
backporting a hotfix from a development branch to a release or maintenance
branch, rescuing a commit that was accidentally pushed to the wrong branch,
and selectively promoting one finished piece of a larger feature branch ahead
of the rest. |
Two Ways to Get There
VB Studio actually gives you two entry points for cherry-picking, depending on where you're working:
• From a workspace in the Designer — useful when you're mid-development and want to pull a commit from a remote branch straight into your working branch for a visual application or extension.
• From the Git page in the VB Studio left navigator — useful when you're working at the repository level, comparing branches, or picking a commit outside of an active Designer session.
This guide walks through the Designer-based workflow, since that's the path most developers hit first, and calls out where the Git-page approach differs.
Before You Start
A cherry-pick is only as good as the commit you're picking, so a little prep up front saves you a conflict-resolution headache later.
• You have write access to the target branch and to the Git repository associated with your project.
• You know — or can find — the revision ID of the commit you want to cherry-pick.
• Your working branch is in a clean state, or you're prepared to commit or stash pending changes before you begin.
• You understand which files the source commit touches, so you can anticipate whether they overlap with recent changes on your target branch.
Step 1 — Find the Revision ID
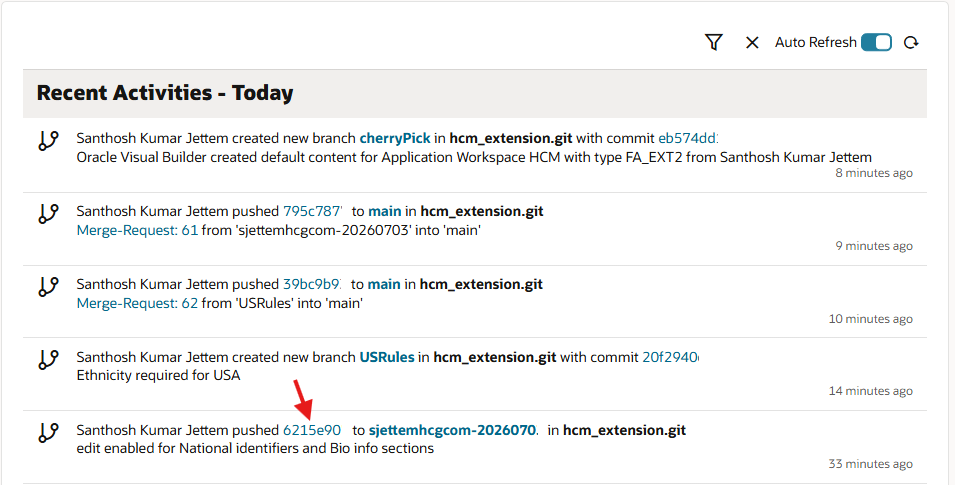
Every cherry-pick starts with a revision ID, and how you find it depends on whether the commit is sitting locally in your own workspace or has already been pushed to a remote branch.
If the Commit Is Local to Your Workspace
1.Open the Git History panel in your workspace.
2.Use the action filters to select Commit, then click Apply Filter to narrow the log down to actual commits.
3.Select the commit you're after, then copy the revision ID shown in the details pane.
If the Commit Was Already Pushed to a Remote Branch
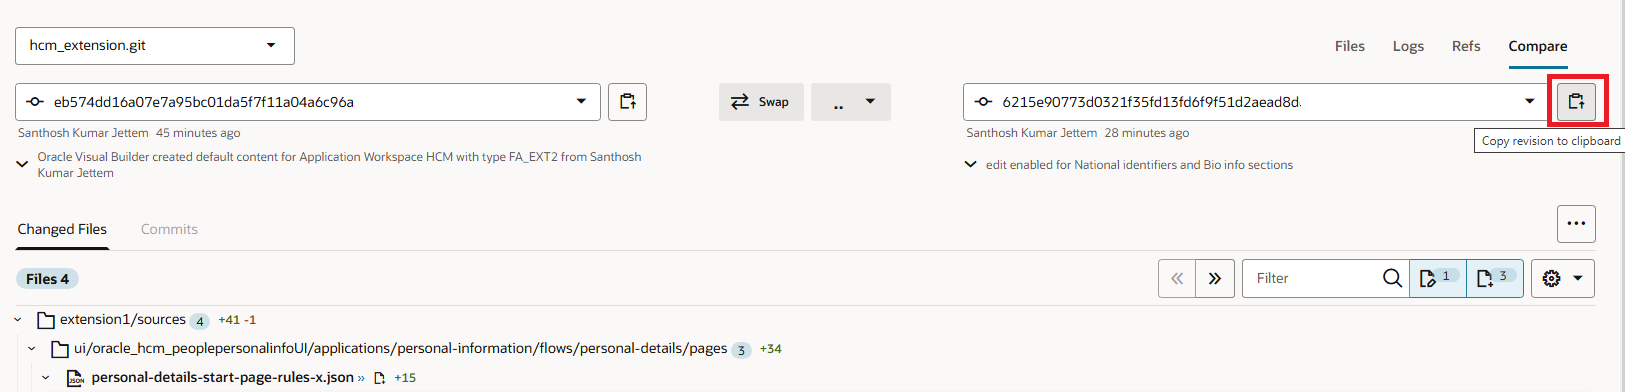
1.Click the navigator icon in the top-left of the header to open the VB Studio navigator.
2.Select Git from the left navigator to open the Git page.
3.If needed, switch to the branch that contains the commit you're looking for.
4.Open the Logs tab and locate the commit in the list.
5.Click the copy-revision icon to copy the revision ID to your clipboard.
|
Tip If you're not sure which commit you need, the Git
page's history graph view (with branch names displayed) makes it much easier
to visually trace where a change originated before you commit to picking it. |
Step 2 — Open the Cherry-Pick Dialog and Fetch the Revision
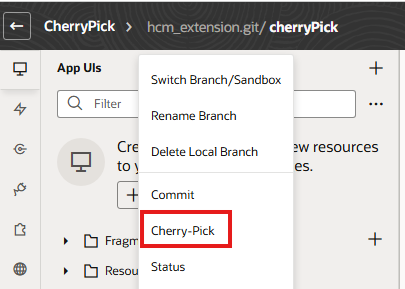
With the revision ID copied, switch to the branch you want the change applied to — this becomes your working branch for the cherry-pick.
|
Step |
Action |
|
1 |
Open the Git menu, either from the header or from the
Git panel in your workspace. |
|
2 |
Select Cherry-Pick to open the Cherry-Pick dialog. |
|
3 |
Paste the revision ID into the field and click Fetch
Revision. |
|
4 |
Use the Changes tab to review exactly which files and
lines the commit touches. |
|
5 |
Use the Log tab to confirm the commit message and
metadata match what you expected. |
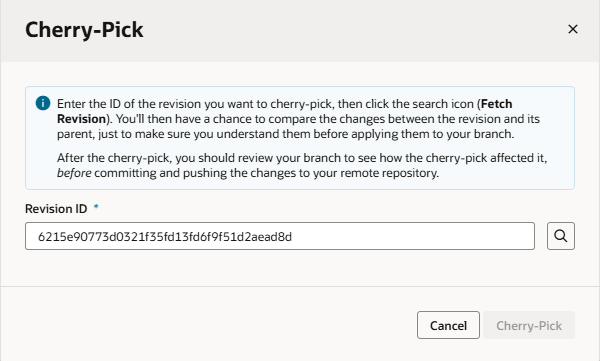
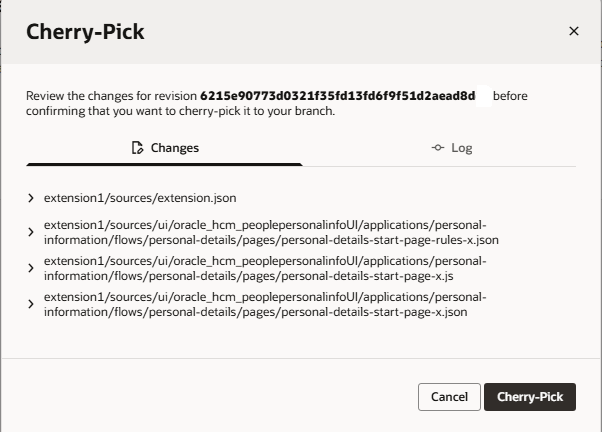
This review step is worth slowing down for. Because a cherry-pick replays the commit's diff onto a different point in history, it's the last easy chance to confirm you're about to apply the change you think you are — before it touches your working branch.
Step 3 — Apply the Cherry-Pick and Commit the Result
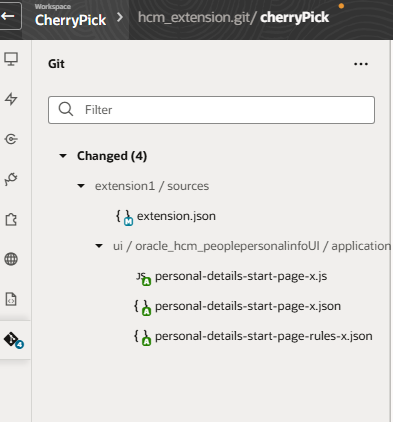
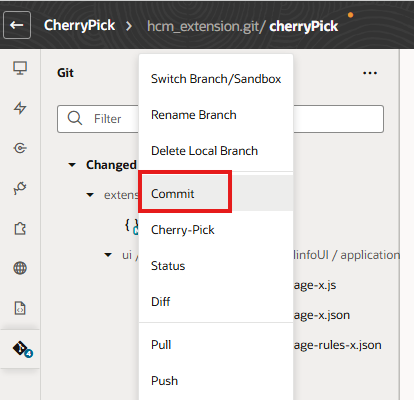
A cherry-pick in VB Studio applies the change to your working branch but stops short of committing it automatically. That's intentional — it gives you a chance to inspect the result before it becomes a permanent part of your branch's history.
• If your branch is already clean, click Cherry-Pick to apply the change.
• If your branch has uncommitted changes, VB Studio prompts you to deal with them first. Click Commit All and Cherry-Pick to commit your pending work and then apply the cherry-pick in one motion.
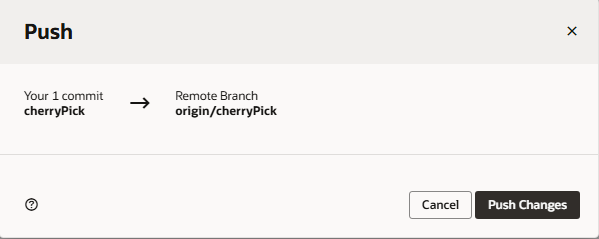
• Either way, you still need to explicitly commit the cherry-picked changes afterward — they land in your working tree, not directly in your branch's history.
|
Good to know The commit you create from a cherry-pick gets its own,
new revision ID, even though its content is identical to the original commit.
VB Studio treats it as a distinct commit in your branch's history, not a copy
of the original. |
Step 4 — Resolving Conflicts
Cherry-picking works cleanly most of the time, but conflicts do happen — typically when the same file has been modified on both the source and target branches since they diverged. When that happens, VB Studio surfaces a conflict message rather than silently guessing which version to keep.
1.Click Close on the conflict message to dismiss the dialog.
2.Open the Git Panel in your workspace.
3.Use the conflict editor to step through each conflicting file and choose which changes to keep.
4.Once conflicts are resolved, commit the result as you normally would.
If you're cherry-picking from the Git page rather than a Designer workspace, conflict handling looks a little different: the Git-page workflow doesn't provide an in-place way to resolve conflicts, so you'll instead be prompted to start a merge request for the change, which routes the cherry-pick through your team's normal review process instead of applying it directly.
Alternative: The Git Command Line
If you're more comfortable working outside the browser UI, VB Studio's repositories are standard Git repositories, so nothing stops you from cherry-picking from the command line instead. Find the commit reference with git log — options like --oneline, --graph, and --decorate make it much easier to visually trace commit history and branch structure — then apply it with:
git cherry-pick <commit-hash>
The underlying mechanics are identical either way: Git generates a patch from the target commit relative to its parent, applies that patch to your working tree, and creates a new commit with a new hash. Whether you use the VB Studio UI or the command line comes down to preference and how much visibility into the diff you want before committing.
Best Practices for Clean Cherry-Picks
• Cherry-pick single, self-contained commits. If a fix is spread across several commits, consider whether a merge or a rebase is actually the better tool for the job.
• Always review the Changes tab before applying — it's cheaper to catch a mismatch there than to unwind it after committing.
• Keep your working branch clean before you start, so you're never guessing which prompt (Cherry-Pick vs. Commit All and Cherry-Pick) is the right one.
• When backporting hotfixes to a protected or review-required branch, expect the merge-request path — build that review time into your release timeline.
• Document why a commit was cherry-picked, especially for hotfix backports, so future readers of the branch history understand the change didn't originate there.
Wrapping Up
Cherry-picking is one of those Git capabilities that looks like a minor convenience until the day you actually need it — a hotfix that has to reach a release branch in the next ten minutes, or a commit that landed on the wrong branch the night before a deadline. VB Studio's built-in Cherry-Pick dialog covers the everyday case well, and falling back to the Git command line is always there for anything more elaborate.
The core habit worth keeping is the same regardless of which path you use: know your revision ID, review the diff before you apply it, and commit deliberately rather than letting the tool do it for you.